
Dec 31, 2018
S/MIME Part 2: Signed, Sealed, and Delivered through SparkPost
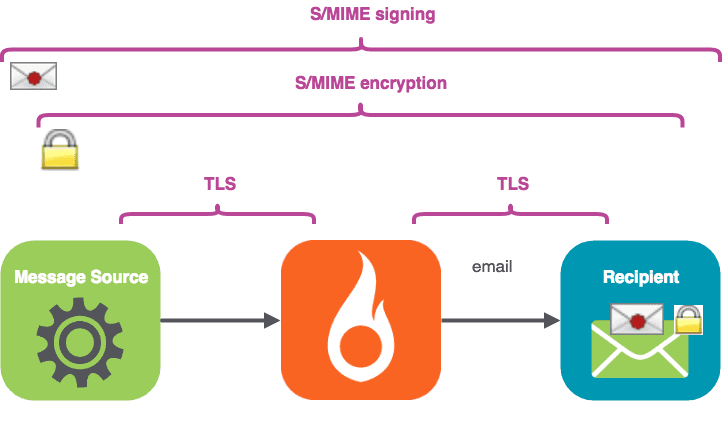
Dans cet épisode, nous allons :
Installer quelques outils simples en ligne de commande pour signer et crypter les courriels
Obtenez votre clé d'expéditeur / certificat pour la signature
Envoyer un message signé via SparkPost, et regarder le message reçu
En option, obtenez votre certificat de destinataire pour le cryptage.
Envoyer un message signé et crypté via SparkPost, et regarder le message reçu
Essayez un outil autonome très pratique, "mimeshow", pour examiner l'intérieur des fichiers de courrier électronique.
OK - commençons !
1. Installez les outils
Le demonstration tools are in Github ici, complete with installation instructions. You might notice the “build passing” logo – Travis and pytest automatically check the build status. Note these tools are not officially supported by SparkPost, but I’ve tried to make them robust and easy to use.
If you have some acquaintance with Python and pip, installation should feel pretty familiar. Le Pipfile takes care of the external dependencies automatically for you. Once it’s done, you can check everything’s installed by running
./sparkpostSMIME.py -h
Vous devriez voir le texte d'aide convivial. Ensuite, nous devons...
2. Obtenez votre clé d'expéditeur / certificat pour la signature
Si vous disposez déjà d'un fichier clé pour votre identité d'envoi, vous pouvez passer directement à l'étape suivante. Sinon, voici deux options parmi lesquelles vous pouvez choisir :
a) Clé / certificat de test auto-signé (non valide en externe)
If you’re just testing, you can make “self signed” certificates and keys for an email address using the command line tool openssl on Linux, following a procedure such as celui-ci. At the end of that process, you’ll have a smime.p12 file. Rename this file to match your sending identity, including the @ sign, for example, alice@example.com.p12 .
or
b) Clés / certificats valables à l'extérieur
If you want to get externally valid keys / certificates that enable you to sign, tici’s a list of providers here. I found Comodo works well (free for non-commercial use), and it’s easier than the self-sign procedure above. Follow the sign-up process, receive your validation mail, and be sure to open the link in Firefox. Go to Firefox Preferences / Vie privée and Security. Scroll to Certificates / View Certificates:

Select your certificate, and use the “Backup” option to save as a file in PKCS12 format (add the file extension .p12 to your filename) which carries the private key and the public certificate chain.

Fournissez un mot de passe pour sécuriser le fichier .p12 :

Générer des fichiers de clé publique (.crt) et privée (.pem) séparés
Que vous ayez utilisé a) ou b), vous disposerez désormais d'un fichier .p12 pour votre identité d'expéditeur. C'est un grand pas en avant - prenez un café maintenant !
Nous devons maintenant générer des fichiers de clés publiques et privées distincts comme ceci - en remplaçant l'adresse électronique de l'exemple par la vôtre. (Mac OSX et Linux) :
openssl pkcs12 -in alice\@example.com.p12 -clcerts -nokeys -out alice\@example.com.crt openssl pkcs12 -in alice\@example.com.p12 -nocerts -nodes -out alice\@example.com.pem
You’ll need to enter the password you provided earlier. Note those backslashes \ are used to s'échapper the @ sign – not separating the names of a directory path (that’s a forward-slash / on Mac OSX and Linux).
If you’re using Windows, there are openssl implementations available such as the MINGW64 one built into the Outils de ligne de commande Git, but I found it tended to just lock up. You’ll probably find it easier and quicker to do this on Linux and then copy your files over. Those same Git tools for Windows come with a nice ssh client you can use to login to a Linux box, such as an Amazon EC2 instance.
2.1 Signer un message
Il y a déjà une clé/cert factice et un fichier source d'email dans le répertoire tests pour alice@example.com, donc vous pouvez obtenir quelques résultats avant même d'avoir vos propres clés. Tapez simplement ce qui suit :
cd tests ../sparkpostSMIME.py exemple_email1.eml --sign
Et vous aurez :
To: Bob <bob@example.com> From: Alice <alice@example.com> Subject: A message MIME-Version: 1.0 Content-Type: application/x-pkcs7-mime; smime-type=signed-data; name="smime.p7m" Content-Transfer-Encoding: base64 Content-Disposition: attachment; filename="smime.p7m" MIIKXAYJKoZIhvcNAQcCoIIKTTCCCkkCAQExDzANBglghkgBZQMEAgEFADCCAQoGCSqGSIb3DQEH AaCB/ASB+VRvOiBCb2IgPGJvYkBleGFtcGxlLmNvbT4NCkZyb206IEFsaWNlIDxhbGljZUBleGFt : :
You can’t actually send emails from example.com via SparkPost unless you own that domain, so the next step is to use your own key and send a signed message from your own domain.
3. Envoyer un message signé via SparkPost
Now let’s use a real sending domain, set up as per the SparkPost Nouveau guide de l'utilisateur. We have the sender certificate and key files in the current directory:
steve@thetucks.com.crt steve@thetucks.com.pem
The file tests/declaration.eml is included in the project. It’s just a text file, so you can customize the From: address to suit your own sending domain and the To: address to suit your test recipient. The beginning of the file looks like this:
To: Bob <bob.lumreeker@gmail.com> From: Steve <steve@thetucks.com> Subject: Here is our declaration MIME-Version: 1.0 Content-Type: text/plain; charset=utf-8; format=flowed Content-Transfer-Encoding: 7bit Content-Language: en-GB When in the Course of human events it becomes necessary …
Définissez votre clé API :
export SPARKPOST_API_KEY=<<Put your API key here>>
Envoyez le courriel :
./sparkpostSMIME.py tests/declaration.eml --sign --send_api
Vous verrez :
Opened connection to https://api.sparkpost.com/api/v1 Sending tests/declaration.eml From: Steve <steve@thetucks.com> To: Bob <bob.lumreeker@gmail.com> OK - in 1.15 seconds
Environ une seconde plus tard, le courriel arrive sur le site inbox de Bob. Thunderbird l'affiche avec un point rouge sur l'enveloppe, indiquant une signature valide de l'expéditeur.

Le succès ! Finissez ce café, vous l'avez bien mérité. Si vous rencontrez des difficultés, vérifiez que l'adresse "From :" dans le fichier e-mail correspond au nom de vos fichiers .crt et .pem.
4. Le chiffrement des messages
Pour chiffrer un message, vous avez besoin de la clé publique de votre destinataire sous forme de certificat. Il s'agit d'un fichier texte qui ressemble à ceci :
Bag Attributes friendlyName: s COMODO CA Limited ID #2 localKeyID: 32 84 AB 9C 56 5C 80 C6 89 4D 40 46 DD D4 7C 71 E8 CD ED C1 subject=/emailAddress=bob.lumreeker@gmail.com issuer=/C=GB/ST=Greater Manchester/L=Salford/O=COMODO CA Limited/CN=COMODO RSA Client Authentication and Secure Email CA -----BEGIN CERTIFICATE----- looks like random characters in here -----END CERTIFICATE-----
Il y a un certificat de destinataire factice pour bob@example.com dans le répertoire des tests, afin que vous puissiez vous exercer avec lui avant d'avoir un certificat réel :
cd tests ../sparkpostSMIME.py exemple_email1.eml --sign --encrypt
Vous verrez :
To: Bob <bob@example.com> From: Alice <alice@example.com> Subject: A message MIME-Version: 1.0 Content-Type: application/pkcs7-mime; smime-type=enveloped-data; name=smime.p7m Content-Transfer-Encoding: base64 Content-Disposition: attachment; filename=smime.p7m MIIRwQYJKoZIhvcNAQcDoIIRsjCCEa4CAQAxggKlMIICoQIBADCBijCBhDELMAkG :
You’ll notice the length of output is quite a bit longer than with an crypté message because it carries a lot of informations supplémentaires as well as the scrambled message itself.
4.1 Envoi d'un message crypté et signé via SparkPost
Let’s send an encrypted message to a real email address. You can follow the same process as before (self-signed or a provider such as Comodo) to get a public key / certificate for your own recipient addresses. You only need the .crt file – the recipient does not ever need to give you their private key (.p12 and .pem files).
I have the file bob.lumreeker@gmail.com.crt for my intended recipient – matching the From: address in my file.
Voici la commande à envoyer :
./sparkpostSMIME.py tests/declaration.eml --sign --encrypt --send_api
Je vois :
Opened connection to https://api.sparkpost.com/api/v1 Sending tests/declaration.eml From: Steve <steve@thetucks.com> To: Bob <bob.lumreeker@gmail.com> OK - in 1.168 seconds
Le courrier apparaît dans Thunderbird avec l'icône de signature "point rouge" et l'icône cryptée "cadenas".

You can send complex HTML-based email with links and images just as easily, such as the one shown in Part 1. Some clients such as Thunderbird ask for permission to display external links and images within encrypted S/MIME messages, but signé seulement messages display well in clients including Thunderbird and Gmail:


Notez que la liste déroulante indique "Adresse électronique vérifiée".
Further thoughts & things to be aware of
Cet outil adopte une approche très simple pour trouver les clés nécessaires - il recherche simplement les fichiers nommés dans le répertoire actuel. Des dispositions plus complexes, telles que la conservation de toutes les clés dans une base de données, pourraient facilement être ajoutées, mais je voulais que le code soit aussi simple que possible.
Vous pouvez inclure d'autres destinataires avec Cc : et Bcc : et ils seront livrés ; cela peut être utile à des fins d'archivage. Les messages signés sont reçus et peuvent être affichés par d'autres destinataires avec la signature. L'outil supprime l'en-tête Bcc : du message remis (comme le ferait un client de messagerie de bureau).
Pour s'assurer que les messages passent par SparkPost sans être modifiés (ce qui pourrait casser la signature), l'outil définit les options de l'API pour un envoi "transactionnel", avec un suivi des ouvertures et des clics désactivé.
Si vous utilisez le cryptage, n'oubliez pas que l'outil ne retient que l'unique adresse To :. Les autres destinataires ne peuvent décoder le corps du message que s'ils disposent de la clé privée du destinataire. Si vous n'utilisez les destinataires secondaires que pour enregistrer les livraisons effectuées, par exemple, cela peut être suffisant.
Signé, scellé, livré... Je suis à vous.
That’s our quick overview of how to sign, seal and deliver S/MIME messages through SparkPost. Quick reminder: the demo project is in Github here, I’ve tried to make it easy to install and use.
Fonctionnalité supplémentaire : affichage des parties MIME avec "mimeshow".
Les internes du fichier MIME multipart de la RFC822 sont assez complexes à lire pour les humains. Le projet inclut un outil autonome pour rendre cela plus facile, appelé mimeshow.
Il prend n'importe quel fichier email que vous avez (pas seulement les fichiers S/MIME) et montre la structure interne. Voici un exemple :
./mimeshow.py testcases/img_and_attachment.eml
Vous verrez :
To Bob <bob.lumreeker@gmail.com> From Steve <steve@thetucks.com> Subject Testing attachments etc MIME-Version 1.0 Content-Type multipart/mixed; boundary="------------7D48652042860D0098C65210" Content-Language en-GB Content-Type multipart/alternative; boundary="------------58C0BF87598336550D70EB95" Content-Type text/plain; charset=utf-8; format=flowed Content-Transfer-Encoding 7bit Content-Transfer-Encoding quoted-printable Content-Type text/html; charset="utf-8" Content-Type application/pdf; name="sparkpost-datasheet-tam-technical-account-management.pdf" Content-Transfer-Encoding base64 Content-Disposition attachment; filename="sparkpost-datasheet-tam-technical-account-management.pdf"
You can also use as a filter to give a human-readable summary of sparkpostSMIME output:
./sparkpostSMIME.py tests/declaration.eml --sign --encrypt | ./mimeshow.py
Vous verrez :
To Bob <bob.lumreeker@gmail.com> From Steve <steve@thetucks.com> Subject Here is our declaration Content-Language en-GB MIME-Version 1.0 Content-Type application/pkcs7-mime; smime-type=enveloped-data; name=smime.p7m Content-Transfer-Encoding base64 Content-Disposition attachment; filename=smime.p7m
Enfin...
To recap – we’ve installed some simple command-line tools for signing and encrypting email (the Github repo is here, complete with installation instructions).
Nous avons obtenu notre clé / certificat d'expéditeur pour la signature, puis nous avons envoyé un message signé via SparkPost. Nous avons obtenu un certificat de destinataire pour le cryptage, puis nous avons envoyé un message signé et crypté via SparkPost.
Enfin, nous avons essayé l'outil autonome pratique "mimeshow" pour examiner l'intérieur des fichiers d'email.
C'est tout pour le moment ! A bientôt !