
Aug 30, 2019
Deploying Signals for On-Premises: PowerMTA Integration
Let’s dive into the details of setting up PowerMTA for SparkPost Signals. You’re going to need:
A host to run the latest version of PowerMTA on – either new, or an existing machine
A SparkPost account with API key permission for “Incoming Events: Write” as described here
We’ll set up PowerMTA to stream events up to your SparkPost account, then you’ll be able to use the following:
Firstly, install (or upgrade) to PowerMTA 5.0 r4 or later, following the usual v5.0 install instructions which are pretty straightforward. Then we’ll work through the following steps:
Configure PowerMTA connector to SparkPost Signals
Set up Engagement Tracking with a custom tracking domain
Select which PowerMTA traffic streams to report to Signals
Testing that your events are reaching Signals
Review how to use meaningful names that show up well in reporting.
We’ll also cover the other specific PowerPMTA setup aspects used in our Signals demo:
FBL events (Spam Complaints) and remote (out-of-band) bounces
Injection configuration, including DKIM
FBL and OOB configuration
VirtualMTA setup and naming (and how this appears in your SparkPost Signals reports)
Finally, there’s a “bonus feature” with code to ensure your campaign names are compatible with PowerMTA X-Job name conventions.
Configure PowerMTA connector
The Signals configuration is described in the 5.0 User Guide section 10.1. Here we’ll start with “Use Case #2”, which enables Signals for all traffic from this PowerMTA host, and enable SparkPost engagement tracking.
# # SparkPost Signals # <signals> api-key ##my ingest API key here## upload-url https://api.sparkpost.com/api/v1/ingest/events log-verbose true min-free-space 1G engagement-tracking sparkpost # this turns on the open and click tracking in PowerMTA customer-id 123 # Your SparkPost account number here </signals> enable-signals true
Here’s what each attribute does:
api-key
This is unique to your SparkPost account, it’s the value you got from SparkPost earlier.
upload-url
This needs to match the address of your SparkPost API service, whether it’s US or EU. For more info see here. The usual values are:
SparkPost (US): https://api.sparkpost.com/api/v1/ingest/events
SparkPost EU: https://api.eu.sparkpost.com/api/v1/ingest/events
log-verbose
This directive is optional and when enabled, gives a bit more info in the pmta.log file, which can be useful during setup to confirm that everything’s working correctly. Each minute, even when there’s no traffic, you’ll see:
2019-07-26 11:47:57 Signals: Discovered 0 files
With traffic, you’ll see something like:
2019-07-26 11:50:57 Signals: Discovered sp1-0000000000003FBD.json 2019-07-26 11:50:57 Signals: Transferred sp1-0000000000003FBD.json successfully. 2019-07-26 11:50:57 Signals: Discovered 1 file, transferred 1 file successfully
min-free-space
This tells PowerMTA the disk space threshold at which it should start to delete the oldest SparkPost JSON event files to make space for new files when disk space is running low.
enable-signals
This tells PowerMTA to upload to Signals, in this case globally for all traffic (more info here, for v5.0). You can be more selective about what traffic streams to upload if you wish.
You can also mark particular PowerMTA traffic to be reported as belonging to a SparkPost subaccount – this is another way to distinguish one particular traffic stream from another.
engagement-tracking, customer-id
PowerMTA’s Engagement Tracking solution defaults to the tracking domain for the SparkPost US-hosted service. You specify your SparkPost numeric customer ID; here’s instructions for finding it.
tracking-domain
For SparkPost EU accounts, add the following line:
tracking-domain pmta.eu.spgo.io # this is the endpoint for SparkPost EU
Custom Tracking domain
If you would prefer to use your own tracking domain (this is better from a deliverability standpoint), do the following:
Create tracking domain with your DNS provider by creating a CNAME record. This will usually be a subdomain of your top-level domain, e.g. track.mycompany.com .
track.mycompany.com CNAME pmta.spgo.io # if you have a SparkPost US account track.mycompany.com CNAME pmta.eu.spgo.io # if you have a SparkPost EU account
You can also use HTTPS tracking domains, although this is more involved (see SparkPost configuration steps here).
Register tracking domain in your SparkPost account, and verify it. Wait a few minutes before trying this, to allow your DNS changes to propagate through the Internet, depending on your DNS provider.
Configure PowerMTA to use that domain instead of the default, with
tracking-domain yourdomain.com # Put your own domain here
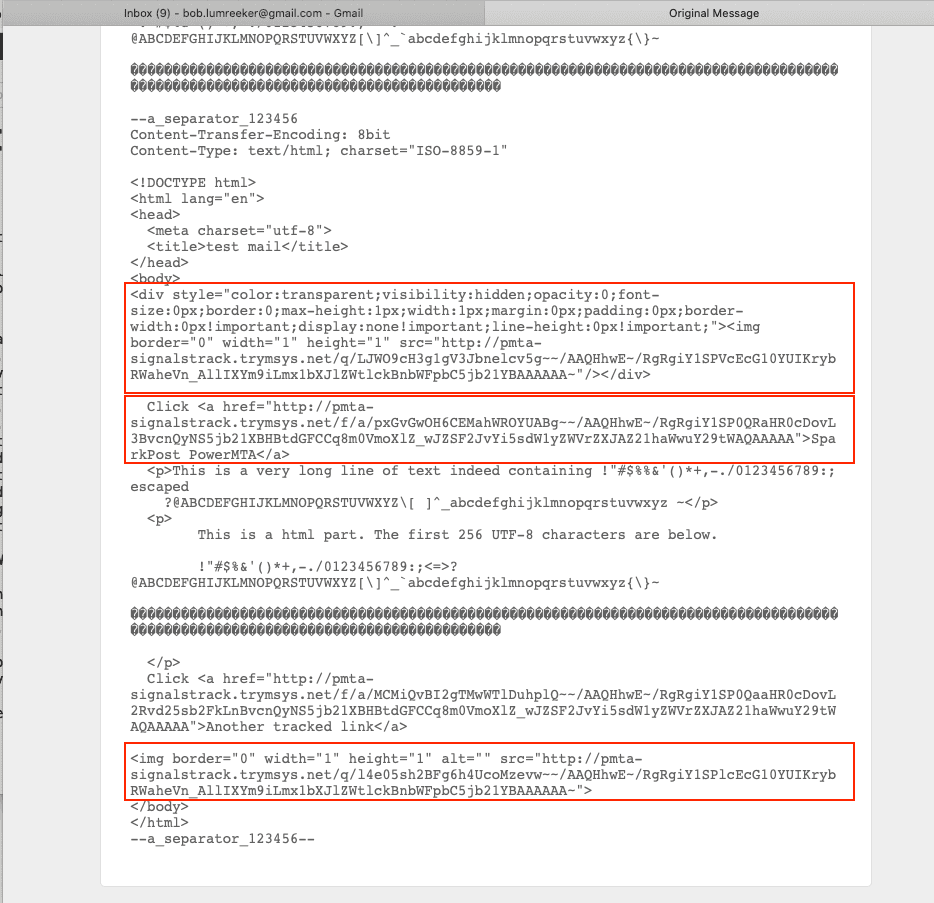
You can check that your delivered emails have “open pixels” added and the links wrapped, by looking at the internals of the mail (in Gmail, use the menu top-right and choose “Show Original”).

You’ll notice the open pixels at the beginning and end of the HTML in the email. Each HTML link is also changed to have REF pointing to the tracking domain.
That’s all you need to get SparkPost Signals working with PowerMTA’s built-in Engagement Tracking.
Preventing specific links in your html email from being tracked
You can prevent PowerMTA from tracking specific links, by setting the custom attribute data-msys-clicktrack to “0” :
<a href="#" data-msys-clicktrack="0">Example</a>
PowerMTA will not wrap the link. It will also remove that attribute prior to transmitting the message to your recipient.
Select which PowerMTA traffic streams to report to Signals
You can select Signals to be active:
Globally (this is what we used in the above example)
For some Virtual MTAs and not others
For some Virtual MTA pools and not others
For specific “Sender” or “From” addresses relayed by PowerMTA, in combination with the Virtual MTA / Virtual MTA pool selections
This configuration is very powerful and is illustrated through a series of example use-cases (v5.0) in the User Guide.
Testing that your events are reaching Signals
Here’s a view of SparkPost Signals, connected to PowerMTA. You can see that the health score is varying.
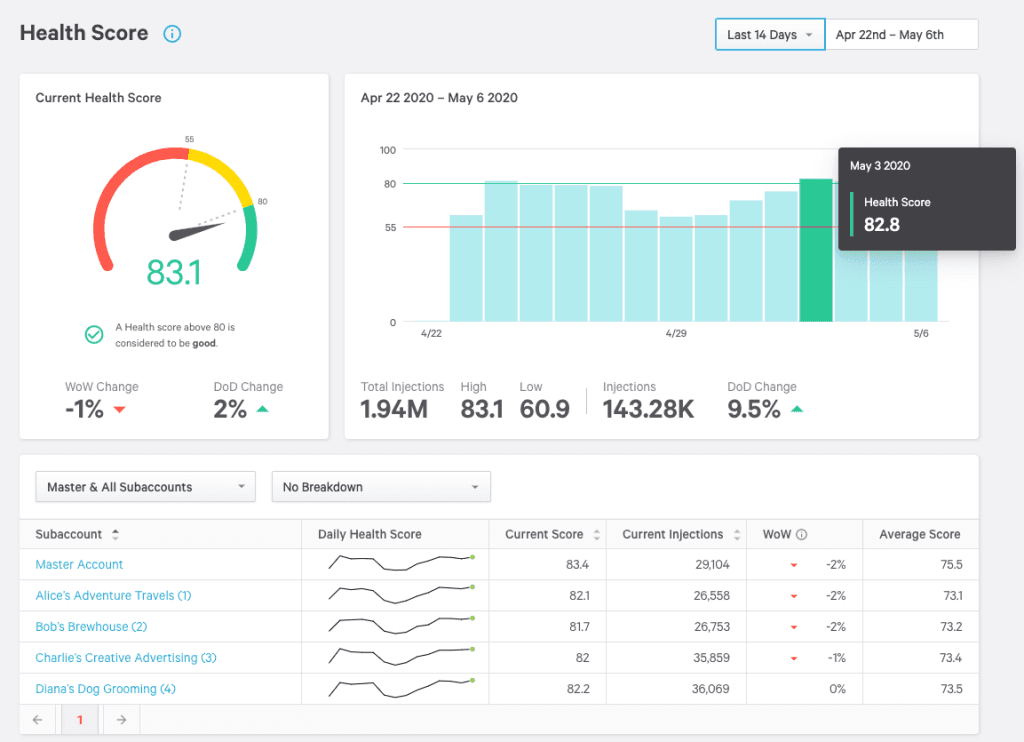
The Campaign names are available as reporting facets, along with Subaccount, IP Pool, Mailbox Provider, and Sending Domain.
As well as looking at the PowerMTA logs, you can check that events data is reaching SparkPost by looking at the Signals Integration screen.
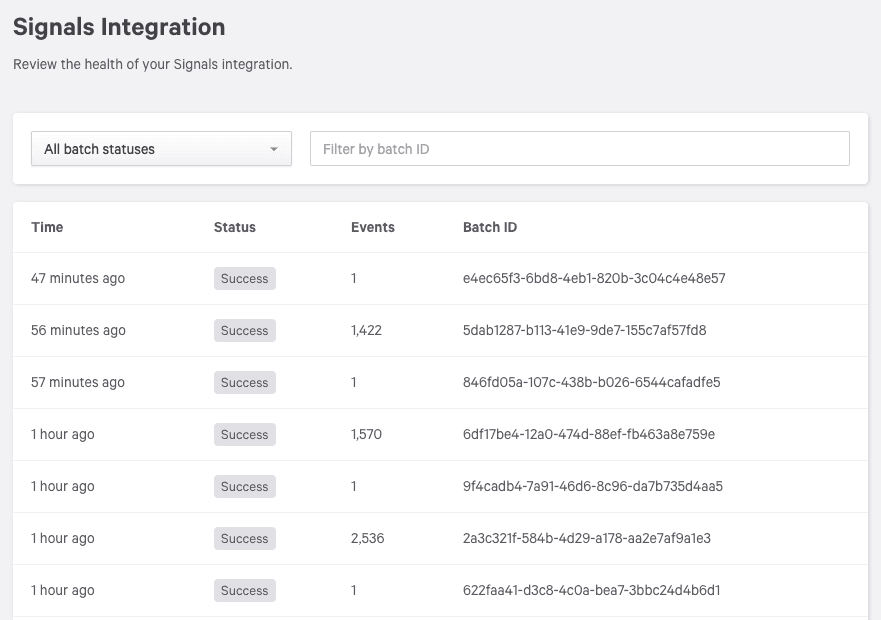
In your SparkPost Events Search screen, you should see events appear within a few minutes. These will include Injection and Delivery events, as well as Bounce, and potentially Out-of-Band Bounce and Spam Complaint events, if you’ve already configured PowerMTA to handle those for you.
If you have Engagement Tracking enabled, you will also see open , initial_open , and click events.
Using meaningful names that show up well in reporting
Setting up the PowerMTA VirtualMTA Pool names and Job names to be meaningful and human-readable is well worth doing. These show up directly in your SparkPost Signals facets and the Summary report.
As mentioned earlier, you don’t need to create these pools in your SparkPost account. SparkPost picks them up from your PowerMTA configuration.
Here’s how PowerMTA configuration terms translate to SparkPost terms.
PowerMTA termSparkPost Reports / Signals termRecipient Domain
(domain portion of “rcpt” field in Accounting file).Recipient DomainThe domain portion of the “Sender” or “From” header in the message relayed by PowerMTA.
(domain portion of “orig” in Accounting file).Sending DomainVirtualMTA (name)—VirtualMTA Pool (name)
(“vmtaPool” in accounting file)IP Pool (name)smtp-source-host a.b.c.d
(“dlvSourceIp” in accounting file)Sending IP a.b.c.dJob (name)
(“jobId” in accounting file)Campaign ID (name)—Template (name)“Subaccount” is not a native PowerMTA concept.
However, PowerMTA can tag virtualMTAs, virtual MTA Pools, or Sender-or-From domains with a subaccount ID for SparkPost reporting purposes.
Subaccount ID (number)FBL (event)Spam Complaint (event)Remote Bounce (event)Out-of-Band bounce (event)
Setting up at least one smtp-source-host address also enables SparkPost to correctly identify the sending IP address so that it shows up on Injection and Delivery events, as well as in the Summary report view.
Job names are set in PowerMTA via a header in the injected message. As well as enabling individual job control (pause/resume etc) which is useful in itself, PowerMTA passes the names through to SparkPost Signals reporting as “campaign ID”. See User Guide v5.0 section 12.8 “Tracking a campaign in PowerMTA with a JobID”.
There are a few things to be aware of regarding job naming. While SparkPost (with JSON format, and JSON escaping) allows characters such as <SPACE> in campaign names, mail headers are more restrictive. Valid characters allowed in the X-Job header are:
A-Za-z0-9!#$%&'()*+,-./:;<=>?@[\]^_{|}~
In other words, disallowed characters include <SPACE>, double-quotes “ and backtick `. If you’re used to working with X-Job names, this won’t be surprising, and your campaign ID names will “just work” on SparkPost reporting. If like me, you learned SparkPost first, you might want a tool to ensure your X-Job values are safe; see the bonus feature at the end of this article.
FBL events (Spam Complaints) and remote (out-of-band) bounces
PowerMTA can receive and process FBL events (known in SparkPost as Spam Complaint events) and remote bounces (known in SparkPost as out-of-band bounces, because the reply comes back some time afterward, rather than during the SMTP conversation).
There are articles in the Port25 Support Forum on how to set up the Bounce Processor and the FBL Processor. If you are an existing PowerMTA user, you probably already have these.
Here’s the configuration I made for a demo, based on these articles and oriented towards hosting PowerMTA in Amazon EC2.
If you’re familiar with PowerMTA configuration in this area, you can skip this part, down to the next horizontal line.
Injection configuration
We’ll use port 587 for injected messages, which will come over the public Internet from another host. We need to stop bad actors discovering and abusing this service, so we apply username/password authentication and optional TLS, similar to SparkPost SMTP injection endpoints.
We want to be able to send messages from sources that are properly authenticated to any destination. We also want a separate listener on port 25 for FBL and remote bounce responses that don’t require authentication
# # IP address(es) and port(s) on which to listen for incoming SMTP connections # smtp-listener 0.0.0.0:587 smtp-listener 0.0.0.0:25
In the following <source> declarations, we’re using username/password authentication and optional TLS to defend against rogue message injection. We also set rate limits on connections making failed password attempts.
Your setup might be different; for example, if you have a private network between injector and PowerMTA, you won’t need password authentication.
# One source rule for all injection, internal or external. Enforce auth, except for bounces and FBLs # <source 0/0> log-connections false log-commands false # WARNING: verbose! just for dev log-data false # WARNING: even more verbose! smtp-service true # allow SMTP service smtp-max-auth-failure-rate 1/min allow-unencrypted-plain-auth false allow-starttls true rewrite-list mfrom </source> <source {auth}> always-allow-relaying yes # only if the auth succeeds default-virtual-mta default process-x-job true </source>
The <source {auth}> declaration (see here. v5.0) applies once authentication has passed. Here, it allows onward relaying, sets up the default virtual MTA group to use, and adds the X-Job header (which will be reported by SparkPost Signals as campaign_id).
The rewrite-list maps injected messages to use a specific MAIL FROM domain (aka bounce domain or Return-Path:).
# # Rewrite the MAIL FROM address to match the bounce domain # <rewrite-list mfrom> mail-from *@pmta.signalsdemo.trymsys.net *@bounces.pmta.signalsdemo.trymsys.net </rewrite-list>
Then we set up our TLS configuration and SMTP username / password, according to current recommendations.
# # Secure the inbound service with username, password and TLS. SMT 2020-06-15 # smtp-server-tls-certificate /etc/pmta/pmtasignalsdemo.pem smtp-server-tls-allow-tlsv1 false smtp-server-tls-allow-tlsv1.1 false smtp-server-tls-allow-tlsv1.2 true smtp-server-tls-allow-tlsv1.3 true # # SMTP users (authenticated via SMTP AUTH) # <smtp-user SMTP_Injection> password ##PUT YOUR PASSWORD HERE## authentication-method password </smtp-user>
We can check that the (insecure, deprecated) TLS v1.0 is not accepted using my favorite SMTP test tool, swaks.
swaks --server pmta.signalsdemo.trymsys.net --port 587 --to test@trymsys.net --from any@sparkpost.com --tls --tls-protocol tlsv1
We see:
*** TLS startup failed (connect(): error:00000000:lib(0):func(0):reason(0)) *** STARTTLS attempted but failed
Likewise for –tls-protocol tlsv1_1.
Let’s also apply DKIM signing on our outgoing messages, as it’s good practice (I followed these instructions to set up the key).
# # DKIM # domain-key mypmta, pmta.signalsdemo.trymsys.net, /etc/pmta/mypmta.pmta.signalsdemo.trymsys.net.pem
FBL and OOB configuration
Now .. finally .. we declare which specific domains are open for remote bounce and FBL responses. We don’t want to relay those anywhere (to prevent backscatter attacks), just internally process those responses.
# # Enable Bounce and FBL processing on specific domains # relay-domain pmta.signalsdemo.trymsys.net relay-domain bounces.pmta.signalsdemo.trymsys.net relay-domain fbl.pmta.signalsdemo.trymsys.net <bounce-processor> deliver-unmatched-email no deliver-matched-email no <address-list> domain pmta.signalsdemo.trymsys.net domain bounces.pmta.signalsdemo.trymsys.net </address-list> </bounce-processor> <feedback-loop-processor> deliver-unmatched-email no deliver-matched-email no <address-list> domain fbl.pmta.signalsdemo.trymsys.net </address-list> </feedback-loop-processor>
You can see I set up two bounce domains, as I was playing around with using/not using the mfrom rewrite rule.
The FBL domain is usually then registered with external services such as Microsoft SNDS; see this article for more information. For this demo, the FBLs will be coming from the Bouncy Sink, so no need to register.
Testing the SMTP listener
It’s important to test that your SMTP listener is requiring authorization for any general destinations, rejecting any messages that are not specifically addressed to the FBL and remote-bounce domains.
swaks --server pmta.signalsdemo.trymsys.net --port 25 --to test@strange.pmta.signalsdemo.trymsys.net --from any@sparkpost.com
The response, as expected, shows that relaying is denied:
550 5.7.1 relaying denied for recipient in "RCPT TO:<test@strange.pmta.signalsdemo.trymsys.net>
(End of demo setup description).
VirtualMTA setup and naming
PowerMTA VirtualMTAs (and VirtualMTA pools) are powerful features for managing message streams, and PowerMTA / SparkPost Signals reporting features work best with these active.
# # Route all outgoing traffic through this virtual mta / pool. # Declare the delivery IP address here, so that SparkPost signals ingest injection (aka "reception") events # will carry the correct sending_IP attribute # <virtual-mta mta1> smtp-source-host 172.31.25.101 pmta.signalsdemo.trymsys.net </virtual-mta> <virtual-mta-pool default> virtual-mta mta1 <domain *> max-smtp-out 20 # max. connections *per domain* bounce-after 4d12h # 4 days, 12 hours retry-after 10m # 10 minutes dkim-sign yes </domain> </virtual-mta-pool>
The virtual-mta-pool setting is reported in SparkPost as “IP Pool”, and is available as a SparkPost Signals reporting facet (the drop-down menu underneath the charts).
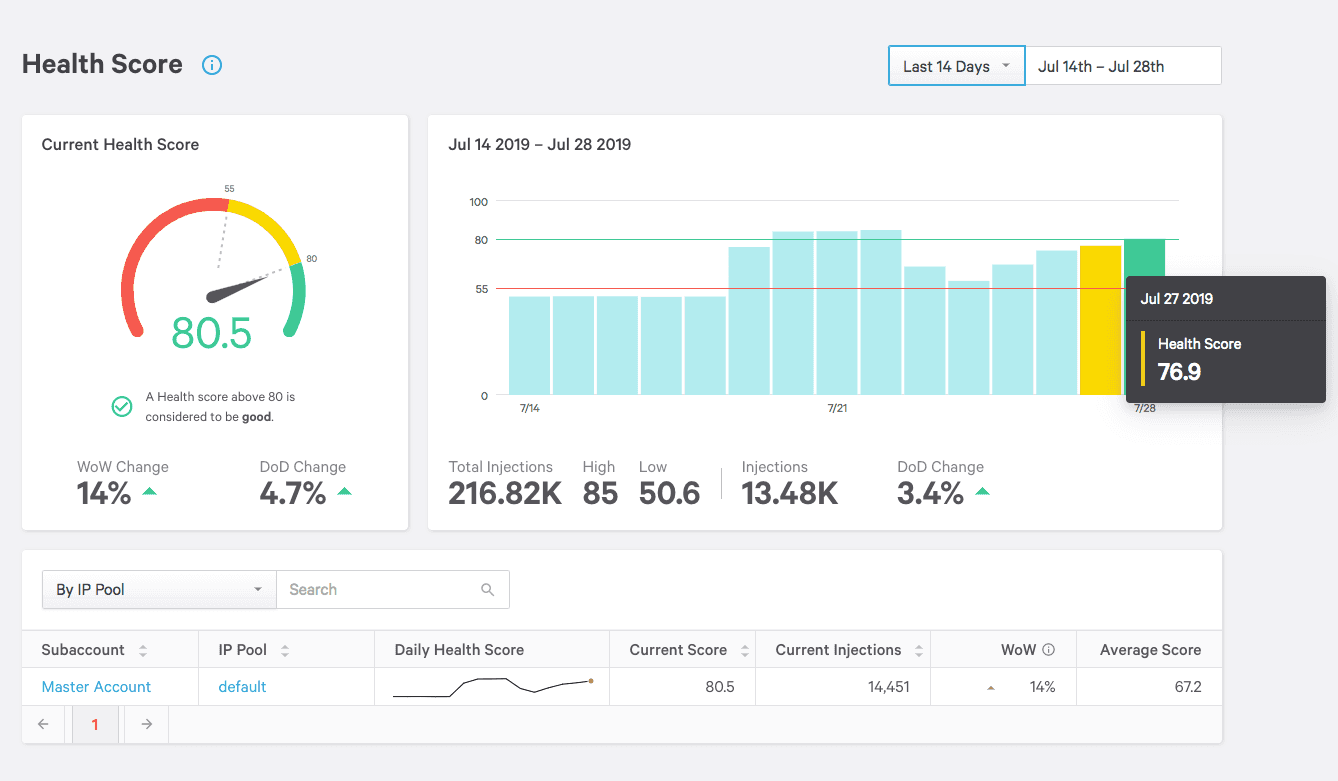
The Summary Report also shows IP Pool as a “Group By” reporting facet.
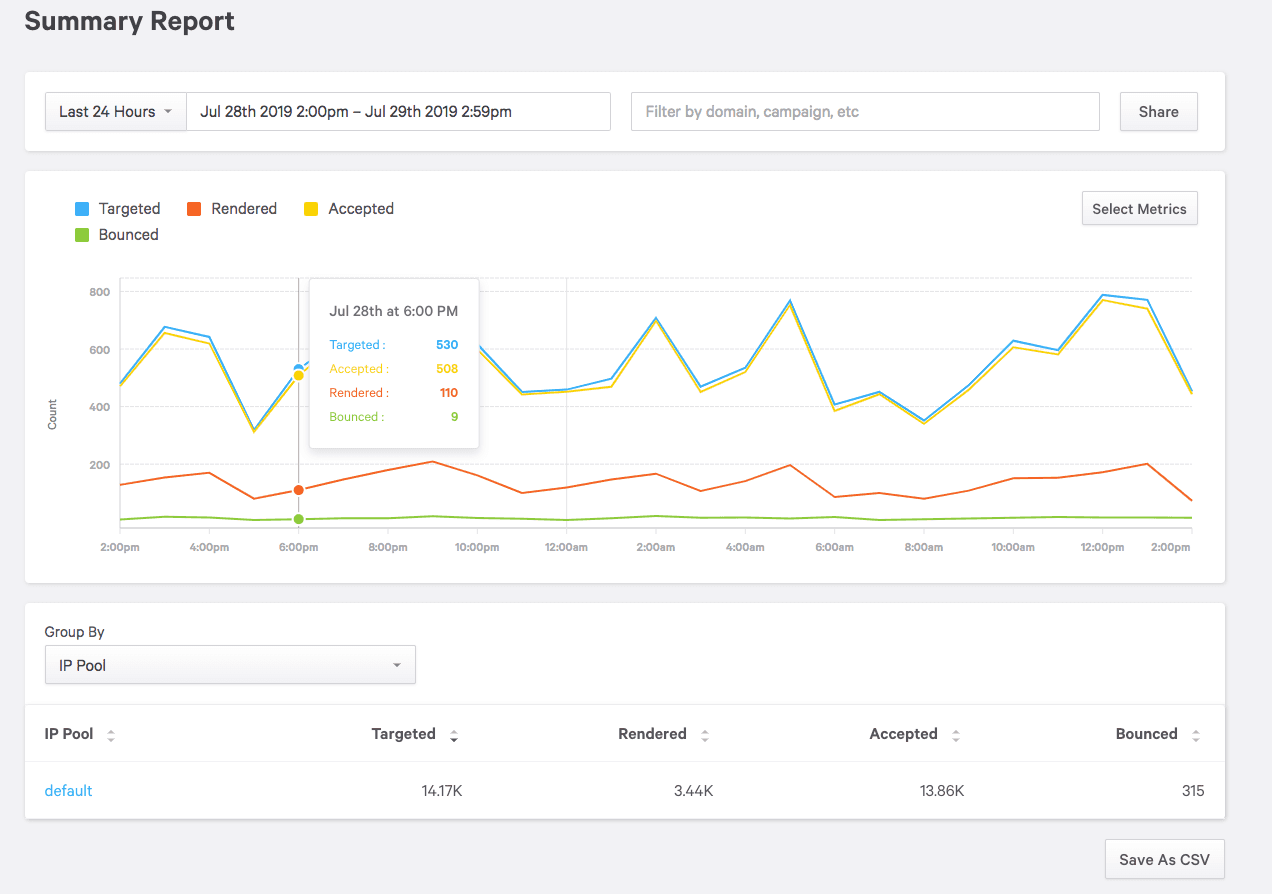
As noted earlier in this article, setting up at least one smtp-source-host address also enables SparkPost to correctly identify the sending IP address, so that it shows up on Injection and Delivery events, and on the Summary Report:

That’s all you need to get a basic integration working between PowerMTA and SparkPost Signals. You’ll find the full config file example here.
Before you go, here’s the bonus feature I mentioned.
Bonus feature: X-Job name checking/filtering
To ensure any character string is safe for use as a PowerMTA X-Job name, here’s a simple Python function to map any unsafe characters to an underscore “_”
import re def pmtaSafeJobID(s): """ :param s: str :return: str Map an arbitrary campaign ID string into allowed chars for PMTA X-Job header. See https://download.port25.com/files/UsersGuide-5.0.html#tracking-a-campaign-in-powermta-with-a-jobid Specifically disallow <sp> " ` but allow through most other chars. """ # Note have to escape ' - [ ] and double-escape \ - see https://docs.python.org/3/library/re.html disallowedChars = '[^A-Za-z0-9!#$%&\'()*+,\-./:;<=>?@\[\\\\\]^_{|}~]' return re.sub(disallowedChars, '_', s)
This uses Python regular expressions in a specific way. It declares the set of disallowed characters using the “set complement” operator ^ rather than list all allowed chars. That means we catch (and make safe) characters beyond the usual 7-bit set. We can show that using this test fragment:
s='' for i in range(32, 256): s += chr(i) print(pmtaSafeJobID(s))
Giving
_!_#$%&'()*+,-./0123456789:;<=>?@ABCDEFGHIJKLMNOPQRSTUVWXYZ[\]^__abcdefghijkl mnopqrstuvwxyz{|}~___________________________________________________________ ______________________________________________________________________
You can see that <SPACE>, double-quotes “, and backtick `, as well as all characters beyond ~ are mapped to underscore.