
Feb 1, 2019
S/MIME Part 4: Collecting Recipient Public Keys the Easy Way – with SparkPost Inbound Relay Webhooks
In 第一部分, we had a quick tour of S/MIME, looking at signing and encryption of our message streams across a range of mail clients. 第二部分 took us through a simple command-line tool to sign and encrypt emails, then send them through SparkPost. Part 3 showed how to inject secure mail streams into on-premises platforms such as 港口25PowerMTA and Momentum.
在这个系列中,我们已经看到包括S/MIME签名是相当简单的。发送S/MIME加密的邮件就比较复杂了,因为你需要获得收件人的公钥。当你使用人类的邮件客户端(如Thunderbird)时,这是一件事--但这如何能与应用程序生成的邮件流一起工作?
但是等等--还有另一种进入魔都的方式来获得这些钥匙。您的服务可以邀请您的客户(当然是通过电子邮件)给您发回一封签名的邮件到一个已知的客户服务地址。使用SparkPost Inbound Relay webhooks的神奇力量,我们将提取并存储该公钥供您使用。
我们可以用一个简单的用例来总结这一点。
作为信息的接收者,我通过电子邮件向你们的服务提供我的个人电子邮件签名,以便今后可以用S/MIME加密的形式向我发送电子邮件。
由此,让我们推导出一些更详细的要求。
我们需要一个始终在线的、可靠的入站电子邮件服务来接收这些签名邮件。
对邮件格式应该没有特别的要求,只是应该带有一个S/MIME签名。
因为任何人都可以尝试向这个服务发送邮件,它应该被设计成具有防御性,例如,拒绝来自不良行为者的 "欺骗 "信息。将需要有几层检查。
If everything checks out OK, the service will store the certificate in a file, using the well-known plain-text 隐私-Enhanced Mail (PEM) format.
有一些非功能性的要求。
机器对机器的webhook服务仅从响应中很难看到里面发生了什么。该服务应该提供广泛的人类可读的应用级日志。特别是,证书解析和检查应该被记录下来。
We add test cases for the app internals, using the nice 实验 framework, and run those tests automatically on check-in using Travis CI integration with GitHub.
好的--让我们开始吧!
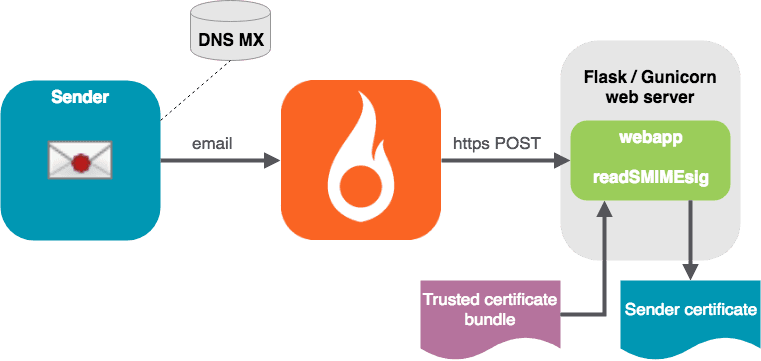
1.解决方案概述
下面是整体解决方案的样子。
2.安装、配置和启动网络应用程序
我们将从这部分开始,这样我们就可以在引入中继网络钩子之前对其进行全面测试。
ǞǞǞ web app is included in the same GitHub项目 as parts 1 – 3, so if you’ve followed those parts, you already have it. Here are the new bits:
程序readSMIMEsig.py - 读取电子邮件并解析出中间和用户证书。
程序webapp.py - 简单的兼容Flask的网络应用程序,用于SparkPost入站中继网络钩。
webapp.ini - 上述的配置文件。配置文件使相同的值可以很容易地传递给命令行和网络应用。
You need to ensure your host has the correct TCP port number open to inbound requests from the outside world so that SparkPost can POST messages to your app. If you’re hosted on AWS EC2, for example, you’ll need to configure the 安全组 of your instance.
Instructions for configuring and starting the web app are given here – it’s quite easy. To check your app is running and accessible from the outside world, you can send (blank) requests from another host using curl, for example:
curl -X POST https://app.trymsys.net:8855/
你应该看到这样的回应。
{"message":"Unknown Content-Type in request headers"}
这是一件好事--你的应用程序正在运行!
在你主机上的webapp.log中,你会看到类似这样的输出。
2019-01-15 00:11:07,575,root,INFO,Request from 38.96.5.10,scheme=https,path=/ 2019-01-15 00:11:07,575,root,INFO,| len(headers)=3,len(body)=None 2019-01-15 00:11:07,575,root,INFO,| Unknown Content-Type。无
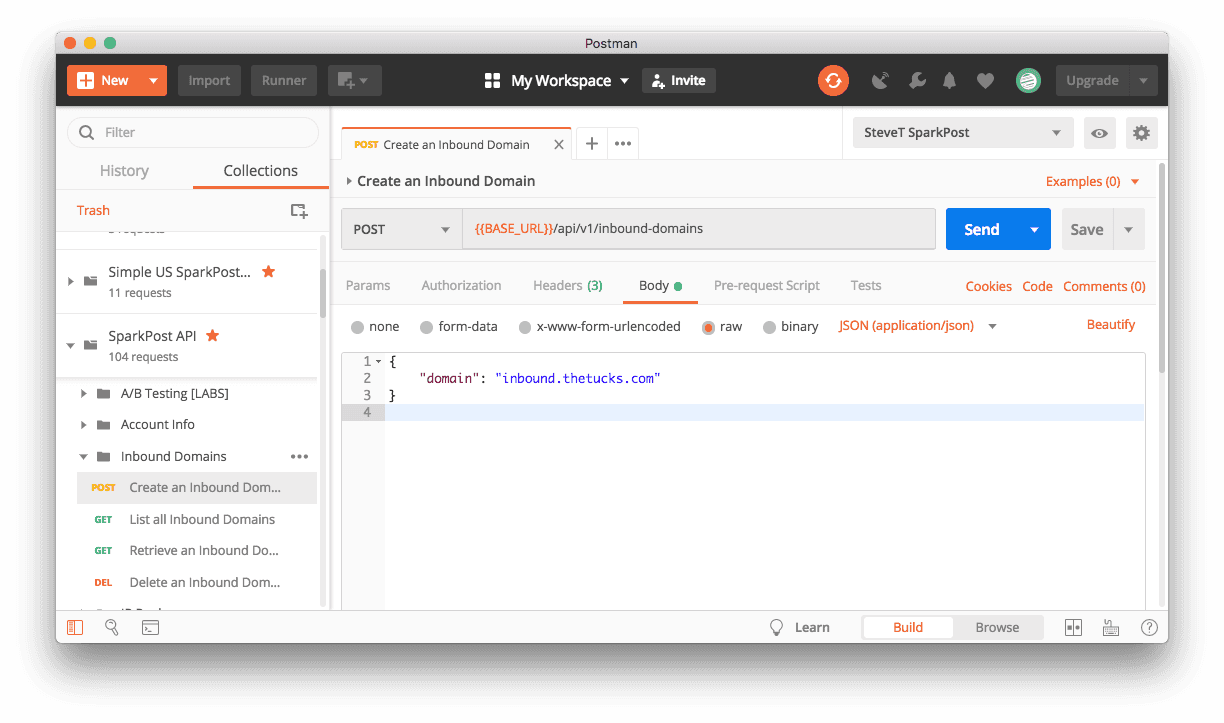
To help you play with real data in your app straight away, you can import this specific 邮递员请求 from the project repo. This simulates what your SparkPost account will be doing, i.e. it sends an https POST containing an email with a specific, valid certificate (belonging to a test account of mine) to your app.
你只需要改变请求中的目标地址(在上面的灰色框中),以匹配你的安装。如果你改变了webapp.ini中的token值,请调整Postman中的header值以匹配。
如果你的应用程序在工作,你会在Postman中看到一个 "200 OK "的响应。你的主机webapp.log文件将包含这样的输出。
2019-01-15 00:11:48,554,root,INFO,Request from 38.96.5.10,scheme=https,path=/ 2019-01-15 00:11:48,554,root,INFO,| len(headers)=10,len(body)=14778 2019-01-15 00:11:48,555,root,INFO,| msg_from=bob.lumreeker@gmail.com,rcpt_to=secureme@inbound.thetucks.com,len(email_rfc822)=9223 2019-01-15 00:11:48,599,root,INFO,| from=bob.lumreeker@gmail.com,DKIM passed 2019-01-15 00:11:48,600,root,INFO,| content-type=multipart/signed; protocol="application/pkcs7-signature"; micalg=sha-256; boundary="------------ms010908020707040304020406",content-description=None 2019-01-15 00:11:48,600,root,INFO,| content-type=text/plain; charset=utf-8; format=flowed,content-description=None 2019-01-15 00:11:48,600,root,INFO,| content-type=application/pkcs7-signature; name="smime.p7s",content-description=S/MIME Cryptographic Signature 2019-01-15 00:11:48,600,root,INFO,| filename=smime.p7s,bytes=3998 2019-01-15 00:11:48,601,root,INFO,| Certificate: subject email_address=['bob.lumreeker@gmail.com'],not_valid_before=2018-10-03 00:00:00,not_valid_after=2019-10-03 23:59:59,hash_algorithm=sha256,key_size=2048 bytes, issuer={'countryName': 'GB', 'stateOrProvinceName': 'Greater Manchester', 'localityName': 'Salford', 'organizationName': 'COMODO CA Limited', 'commonName': 'COMODO RSA Client Authentication and Secure Email CA'} 2019-01-15 00:11:48,602,root,INFO,| Certificate: subject email_address=[],not_valid_before=2013-01-10 00:00:00,not_valid_after=2028-01-09 23:59:59,hash_algorithm=sha384,key_size=2048 bytes, issuer={'countryName': 'GB', 'stateOrProvinceName': 'Greater Manchester', 'localityName': 'Salford', 'organizationName': 'COMODO CA Limited', 'commonName': 'COMODO RSA Certification Authority'} 2019-01-15 00:11:48,616,root,INFO,| written file ./bob.lumreeker@gmail.com.crt,bytes=1870,ok=True
为了快速检查是否正确,请看最后一行--如果它说 "写入文件",那么你就可以了。其余部分显示的是DKIM检查和证书验证过程。
3.SparkPost入站中继网络钩子的设置
Firstly, we select a domain to use as our inbound message address – here, it will be inbound.thetucks.com. Set your domain up following this guide. Here are the steps I used in detail:
3.1 添加MX记录
你需要访问你的特定互联网服务提供商账户。完成后,你可以用dig检查它们--这里是我的域名的命令。
dig +short MX inbound.thetucks.com
你应该看看。
10 rx3.sparkpostmail.com.10 rx1.sparkpostmail.com.10 rx2.sparkpostmail.com.
3.2 创建一个入网域名
Use the SparkPost Postman API集合, selecting the Inbound Domains / Create .. call. ǞǞǞ body of the POST request contains your domain, for example:
{ "domain": "inbound.thetucks.com" }
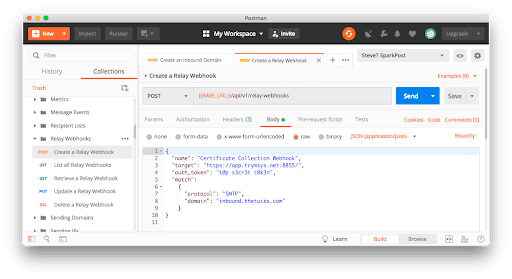
3.3 创建一个中继Webhook
使用相关的Postman调用创建一个入站中继网络钩子。在我的例子中,消息主体包含。
{ "name": "Certificate Collection Webhook", "target": "https://app.trymsys.net:8855/", "auth_token": "t0p s3cr3t t0k3n", "match": { "protocol": "SMTP", "domain": "inbound.thetucks.com" } }
As mentioned before, I recommend 设置一个auth_token to your own secret value, as set in the webapp.ini file on your host.
你的 "目标 "值需要匹配你的主机地址和TCP端口,你将在那里托管网络应用。
你的 "域名 "值需要与你在步骤1中设置的MX记录相匹配。
这就是了!管道工程已经完成。你现在应该能够向你的入站地址发送证书,它们将被处理并显示在你的网络应用程序主机上--在这种情况下,一个名为bob.lumreeker@gmail.com.crt 的文件。
Now you can send encrypted emails to Bob, using the tools described in parts 2 & 3 of this series.
你可以用以下方法检查证书的内容。
openssl x509 -inform PEM -in bob.lumreeker\@gmail.com.crt -text -noout
4.内部结构。DKIM检查,证书验证
The app checks received emails have valid DKIM and checks that the certificates themselves are valid, as described here. There are implementation notes in there too, and ideas for further work.
总结一下...
我们已经看到了如何使用电子邮件向入站中继网络钩子地址轻松收集收件人的公钥。一旦完成,这些收件人就能以S/MIME加密的形式收到他们的邮件。
暂时就这样吧!快乐的发送。