
Dec 31, 2018
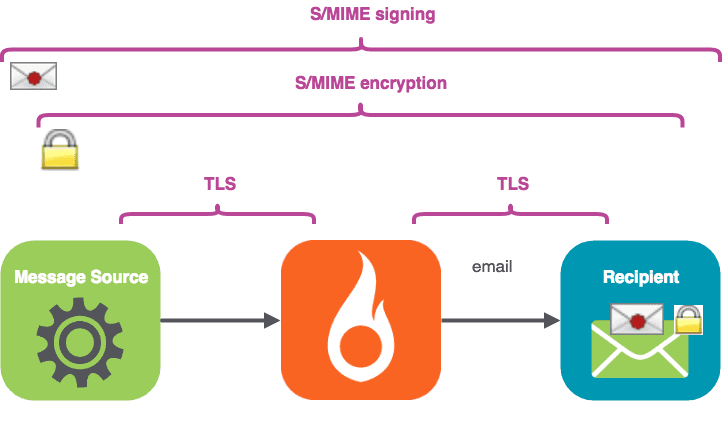
S/MIME Part 2: Signed, Sealed, and Delivered through SparkPost
在本期节目中,我们将。
安装一些简单的命令行工具来签署和加密电子邮件
获取你的发件人密钥/证书进行签名
通过SparkPost发送一个签名的信息,并查看收到的信息
可选择获取你的收件人证书进行加密
通过SparkPost发送一个经过签名和加密的信息,并查看收到的信息
试试一个方便的独立工具 "mimeshow "来查看电子邮件文件的内部结构。
好的--让我们开始吧!
1.安装工具
ǞǞǞ demonstration tools are in Github 这里, complete with installation instructions. You might notice the “build passing” logo – 袚芯褉芯写褋褌胁芯胁邪薪薪褘泄 and pytest automatically check the build status. Note these tools are not officially supported by SparkPost, but I’ve tried to make them robust and easy to use.
If you have some acquaintance with Python and pip, installation should feel pretty familiar. ǞǞǞ Pipfile takes care of the external dependencies automatically for you. Once it’s done, you can check everything’s installed by running
./sparkpostSMIME.py -h
你应该看到友好的帮助文本。接下来,我们需要...
2. 获取你的发件人密钥/证书进行签名
如果你已经有了你的发送身份的密钥文件,你可以跳过前面。否则,这里有两个选项供你选择。
a) 自签的测试密钥/证书(不具有外部效力)。
If you’re just testing, you can make “self signed” certificates and keys for an email address using the command line tool openssl on Linux, following a procedure such as 这个. At the end of that process, you’ll have a smime.p12 file. Rename this file to match your sending identity, including the @ sign, for example, alice@example.com.p12 .
or
b) 外部有效的钥匙/证书
If you want to get externally valid keys / certificates that enable you to sign, t这里’s a list of providers here. I found 科莫多 works well (free for non-commercial use), and it’s easier than the self-sign procedure above. Follow the sign-up process, receive your validation mail, and be sure to open the link in Firefox. Go to Firefox Preferences / 隐私 and Security. Scroll to Certificates / View Certificates:

Select your certificate, and use the “Backup” option to save as a file in PKCS12 format (add the file extension .p12 to your filename) which carries the private key and the public certificate chain.

提供一个密码以确保.p12文件的安全。

生成单独的公钥(.crt)和私钥(.pem)文件
无论你用的是a)还是b),你现在都会有一个.p12文件作为你的发件人身份。这是一个很大的进步--现在就去喝杯咖啡吧!
现在我们需要像这样生成独立的公钥和私钥文件--用你自己的电子邮件地址代替例子中的地址。(Mac OSX和Linux)。
openssl pkcs12 -in alice\@example.com.p12 -clcerts -nokeys -out alice@example.com.crt openssl pkcs12 -in alice\@example.com.p12 -nocerts -nodes -out alice/@example.com.pem
You’ll need to enter the password you provided earlier. Note those backslashes \ are used to 逃避 the @ sign – not separating the names of a directory path (that’s a forward-slash / on Mac OSX and Linux).
If you’re using Windows, there are openssl implementations available such as the MINGW64 one built into the Git命令行工具, but I found it tended to just lock up. You’ll probably find it easier and quicker to do this on Linux and then copy your files over. Those same Git tools for Windows come with a nice ssh client you can use to login to a Linux box, such as an 亚马逊EC2 instance.
2.1 签署一份邮件
在测试目录中已经有一个假的密钥/证书和电子邮件源文件,alice@example.com,所以你甚至在拥有自己的密钥之前就可以得到一些输出。只需输入以下内容。
cd tests .../sparkpostSMIME.py example_email1.eml --sign
而且你会得到。
To: Bob <bob@example.com> From: Alice <alice@example.com> Subject: A message MIME-Version: 1.0 Content-Type: application/x-pkcs7-mime; smime-type=signed-data; name="smime.p7m" Content-Transfer-Encoding: base64 Content-Disposition: attachment; filename="smime.p7m" MIIKXAYJKoZIhvcNAQcCoIIKTTCCCkkCAQExDzANBglghkgBZQMEAgEFADCCAQoGCSqGSIb3DQEH AaCB/ASB+VRvOiBCb2IgPGJvYkBleGFtcGxlLmNvbT4NCkZyb206IEFsaWNlIDxhbGljZUBleGFt : :
You can’t actually send emails from example.com via SparkPost unless you own that domain, so the next step is to use your own key and send a signed message from your own domain.
3.通过SparkPost发送签名信息
Now let’s use a real sending domain, set up as per the SparkPost 新用户指南. We have the sender certificate and key files in the current directory:
steve@thetucks.com.crt steve@thetucks.com.pem
The file tests/declaration.eml is included in the project. It’s just a text file, so you can customize the From: address to suit your own sending domain and the To: address to suit your test recipient. The beginning of the file looks like this:
To: Bob <bob.lumreeker@gmail.com> From: Steve <steve@thetucks.com> Subject: Here is our declaration MIME-Version: 1.0 Content-Type: text/plain; charset=utf-8; format=flowed Content-Transfer-Encoding: 7bit Content-Language: en-GB When in the Course of human events it becomes necessary …
设置你的API密钥。
export SPARKPOST_API_KEY=<<Put your API key here>>
发送电子邮件。
./sparkpostSMIME.py tests/declaration.eml --sign --send_api
你会看到。
Opened connection to https://api.sparkpost.com/api/v1 Sending tests/declaration.eml From: Steve <steve@thetucks.com> To: Bob <bob.lumreeker@gmail.com> OK - in 1.15 seconds
大约过了一秒钟,电子邮件到达鲍勃的inbox 。Thunderbird 在信封上显示了一个红点,表明发件人签名有效。

成功!喝完那杯咖啡吧,这是你应得的。如果你有问题,请检查你的电子邮件文件中的发件人:地址是否与你的.crt和.pem文件的名称相符。
4.加密信息
为了加密信息,你需要证书形式的收件人的公钥。这是一个文本文件,看起来像这样。
Bag Attributes friendlyName: s COMODO CA Limited ID #2 localKeyID: 32 84 AB 9C 56 5C 80 C6 89 4D 40 46 DD D4 7C 71 E8 CD ED C1 subject=/emailAddress=bob.lumreeker@gmail.com issuer=/C=GB/ST=Greater Manchester/L=Salford/O=COMODO CA Limited/CN=COMODO RSA Client Authentication and Secure Email CA -----BEGIN CERTIFICATE----- looks like random characters in here -----END CERTIFICATE-----
在测试目录中,有一个用于bob@example.com 的假收件人证书,所以你可以在拥有真正的证书之前用它来练习。
cd tests .../sparkpostSMIME.py example_email1.eml --sign --encrypt
你会看到。
To: Bob <bob@example.com> From: Alice <alice@example.com> Subject: A message MIME-Version: 1.0 Content-Type: application/pkcs7-mime; smime-type=enveloped-data; name=smime.p7m Content-Transfer-Encoding: base64 Content-Disposition: attachment; filename=smime.p7m MIIRwQYJKoZIhvcNAQcDoIIRsjCCEa4CAQAxggKlMIICoQIBADCBijCBhDELMAkG :
You’ll notice the length of output is quite a bit longer than with an 加密的 message because it carries a lot of 额外信息 as well as the scrambled message itself.
4.1 通过SparkPost发送加密的签名信息
Let’s send an encrypted message to a real email address. You can follow the same process as before (self-signed or a provider such as Comodo) to get a public key / certificate for your own recipient addresses. You only need the .crt file – the recipient does not ever need to give you their private key (.p12 and .pem files).
I have the file bob.lumreeker@gmail.com.crt for my intended recipient – matching the From: address in my file.
下面是要发送的命令。
./sparkpostSMIME.py tests/declaration.eml --sign --encrypt --send_api
我明白了。
Opened connection to https://api.sparkpost.com/api/v1 Sending tests/declaration.eml From: Steve <steve@thetucks.com> To: Bob <bob.lumreeker@gmail.com> OK - in 1.168 seconds
邮件在Thunderbird中显示了 "红点 "签名图标和 "挂锁 "的加密图标。

You can send complex HTML-based email with links and images just as easily, such as the one shown in Part 1. Some clients such as Thunderbird ask for permission to display external links and images within encrypted S/MIME messages, but 只签名的 messages display well in clients including Thunderbird and Gmail:


注意下拉菜单显示 "已验证的电子邮件地址"。
Further thoughts & things to be aware of
这个工具采取了一种超级简单的方法来提取必要的键--它只是在当前目录下寻找命名的文件。更复杂的安排,如在数据库中保存所有的键,可以很容易地加入,但我希望代码尽可能地简单。
你可以用抄送:和密送:包括其他收件人,他们将被送达;这对存档很有用。有签名的邮件会被收到,并可以被其他收件人显示,并带有签名。该工具会将Bcc:头从发送的邮件中剥离出来(就像桌面邮件客户端会做的那样)。
为了确保邮件通过SparkPost时不发生变化(这可能会破坏签名),该工具为 "事务性 "邮件设置了API选项,禁用打开和点击跟踪。
如果你使用加密,请记住,该工具会拾取单一的To: 地址来进行加密。其他收件人只有在拥有收件人私钥的情况下才能解码邮件正文。如果你只是用次要的收件人作为已交付的记录,例如,这可能是OK的。
签名,密封交付...我是你的。
That’s our quick overview of how to sign, seal and deliver S/MIME messages through SparkPost. Quick reminder: the demo project is in Github here, I’ve tried to make it easy to install and use.
额外功能:用 "mimeshow "显示MIME部分
RFC822 MIME多部分文件的内部结构对人类来说是相当复杂的。该项目包括一个独立的工具,以使其更容易,称为mimeshow。
这需要你拥有的任何电子邮件文件(不仅仅是S/MIME文件),并显示其内部结构。这里有一个例子。
./mimeshow.py testcases/img_and_attachment.eml
你会看到。
To Bob <bob.lumreeker@gmail.com> From Steve <steve@thetucks.com> Subject Testing attachments etc MIME-Version 1.0 Content-Type multipart/mixed; boundary="------------7D48652042860D0098C65210" Content-Language en-GB Content-Type multipart/alternative; boundary="------------58C0BF87598336550D70EB95" Content-Type text/plain; charset=utf-8; format=flowed Content-Transfer-Encoding 7bit Content-Transfer-Encoding quoted-printable Content-Type text/html; charset="utf-8" Content-Type application/pdf; name="sparkpost-datasheet-tam-technical-account-management.pdf" Content-Transfer-Encoding base64 Content-Disposition attachment; filename="sparkpost-datasheet-tam-technical-account-management.pdf"
You can also use as a filter to give a human-readable summary of sparkpostSMIME output:
./sparkpostSMIME.py tests/declaration.eml --sign --encrypt | ./mimeshow.py
你会看到。
To Bob <bob.lumreeker@gmail.com> From Steve <steve@thetucks.com> Subject Here is our declaration Content-Language en-GB MIME-Version 1.0 Content-Type application/pkcs7-mime; smime-type=enveloped-data; name=smime.p7m Content-Transfer-Encoding base64 Content-Disposition attachment; filename=smime.p7m
最后...
To recap – we’ve installed some simple command-line tools for signing and encrypting email (the Github repo is here, complete with installation instructions).
我们得到了用于签名的发件人密钥/证书,并通过SparkPost发送了一份签名的邮件。我们得到了一个用于加密的收件人证书,然后通过SparkPost发送了一个经过签名和加密的信息。
最后,我们尝试使用方便的独立工具 "mimeshow "来查看电子邮件文件的内部结构。
暂时就这样吧!再见了!。